|
Size: 2193
Comment:
|
Size: 4448
Comment:
|
| Deletions are marked like this. | Additions are marked like this. |
| Line 6: | Line 6: |
| wpfXamlEditor is a Xaml editor for an APL variable in a workspace or for a file on disk in a manner similar to '''Kaxaml''' ([[http://www.Kaxaml.com||target='_blank']]). The user command is able to show the Xaml in color with folding, print and reorganize it so it is more readable according to some settings set by the user. | `XamlEditor` is a Xaml editor for an APL variable or for a file on disk. This user command is able to show the Xaml in color with folding, print it, reorganize it so it is more readable according to some settings set by the user. It is inspired by the work of Robby Ingebretsen of '''Kaxaml''' ([[http://www.Kaxaml.com||target='_blank']]). It is particularly valuable for APLers that like to keep their Xaml in the workspace. With `XamlEditor` they have a tool to maintain it without effort. |
| Line 8: | Line 9: |
| Once installed the user command can be invoke by doing `]XamlEditor` (casing is not important). The following start-up screen should appear:<<BR>> {{attachment:InitialView.png || width=820}} Here is a description for each buttons: || '''Button''' || '''Explanation''' || || {{attachment:Exec32.png || width=32}} || Execute the Xaml and show the result in a separate window || || {{attachment:Scrubber24.png || width=24}} || Scrub the Xaml according to settings || || {{attachment:OpenObject24.png || width=24}} || Open a dialog box to Select a Xaml variable in the WS || || {{attachment:SaveObject24.png || width=24}} || Open a dialog box to Save the Xaml as a variable in the WS || || {{attachment:Open24.png || width=24}} || Open a dialog box to Select a file on disk || || {{attachment:Save24.png || width=24}} || Open a dialog box to Save the Xaml to a file || || {{attachment:Cut24.png || width=24}} || Cut the Selected text || || {{attachment:Copy24.png || width=24}} || Copy the Selected text || || {{attachment:Paste24.png || width=24}} || Paste the text in the clipboard || || {{attachment:SelectAll24.png || width=24}} || Select All the Xaml || || {{attachment:Delete24.png || width=24}} || Delete the Selected text || || {{attachment:ClearClipboard24.png || width=24}} || Clear the Clipboard || || {{attachment:Undo24.png || width=24}} || Undo last operation || || {{attachment:Redo24.png || width=24}} || Redo previous operation || || {{attachment:Print32.png || width=32}} || Print all the Xaml || || {{attachment:PrintPreview32.png || width=32}} || Print Preview all the Xaml || || {{attachment:Comments24.png || width=24}} || Make selected text a comment || || {{attachment:Settings24.png || width=24}} || Choose the Settings when Scrubbing || |
Once installed the user command can be invoke by typing `]XamlEditor` (casing is not important, no argument). The following start-up screen will appear:<<BR>><<BR>> {{attachment:InitialView.png || width=677}} <<BR>>Here is a short description for each buttons: ||'''Button'''||'''Explanation'''||'''Button'''||'''Explanation'''|| ||{{attachment:Exec32.png || width=24}}|| Execute the Xaml and Show the Result in a Separate Window ||{{attachment:SelectAll24.png || width=24}} || Select All the Xaml || ||{{attachment:Scrubber24.png || width=24}} || Scrub the Xaml According to Settings ||{{attachment:Delete24.png || width=24}} || Delete the Selected Text || ||{{attachment:OpenObject24.png || width=24}} || Open a Dialog Box to Select a Xaml Variable in the WS ||{{attachment:ClearClipboard24.png || width=24}} || Clear the Clipboard || ||{{attachment:SaveObject24.png || width=24}} || Open a Dialog Box to Save the Xaml as a Variable in the WS ||{{attachment:Undo24.png || width=24}} || Undo Last Operation || ||{{attachment:Open24.png || width=24}} || Open a Dialog Box to Select a File on Disk ||{{attachment:Redo24.png || width=24}} || Redo Previous Operation || ||{{attachment:Save24.png || width=24}} || Open a Dialog Box to Save the Xaml to a File ||{{attachment:Print32.png || width=24}} || Print All the Xaml || ||{{attachment:Cut24.png || width=24}} || Cut the Selected Text to The Clipboard ||{{attachment:PrintPreview32.png || width=24}} || Print Preview All the Xaml || ||{{attachment:Copy24.png || width=24}} || Copy the Selected Text to the Clipboard ||{{attachment:Comments24.png || width=24}} || Make Selected Text a Comment || ||{{attachment:Paste24.png || width=24}} || Paste the Text From the clipboard ||{{attachment:Settings24.png || width=24}} || Choose the Settings when Scrubbing || == Installation == 1. Download the file [[attachment:wpfXamlEditor.1.0.zip]]. It contains the Dyalog user command file `wpfXamlEditor.dyalog` and a dll named `ICSharpCode.AvalonEdit.dll` 1. Copy the file `wpfXamlEditor.dyalog` to your user command directory (for advice how to organize your User Commands see [[UserCommands/WhereShouldTheyGo||target='_blank']]). 1. Copy the file `ICSharpCode.AvalonEdit.dll` to the same directory as your `dyalog.exe` file (as shown by doing `+2 ⎕NQ'.' 'GetEnvironment' 'Dyalog'`)(you may need administrator privileges for doing that). That dll is free of charge and was written by Daniel Grunwald. It can be downloaded from [[http://www.codeproject.com/Articles/42490/Using-AvalonEdit-WPF-Text-Editor|CodeProject|target='_blank']] or from [[http://avalonedit.net/|AvalonEdit|target='_blank']] but is included in the zip file for commodity. == Detailed Explanations == ||{{attachment:Exec32.png || width=24}}|| Execute the Xaml and Show the Result in a Separate Window || <<BR>>The settings for scrubbing are saved in a xml file named `XED.Settings.xml`. The file will be created automatically the first time the user command runs. It will be located next to the `wpfXamlEditor.dyalog` file or in the `AppData` directory depending on the Windows version and security. The data of the file looks like this:<<BR>> {{{ <Settings> <EditorFont>APL385 Unicode</EditorFont> <EditorFontSize>14</EditorFontSize> <ReducePrecision>0</ReducePrecision> <Precision>10</Precision> <AttributeCounteTolerance>2</AttributeCounteTolerance> <ReorderAttributes>1</ReorderAttributes> <RemoveCommonDefaultValues>1</RemoveCommonDefaultValues> <ConvertTabsToSpaces>1</ConvertTabsToSpaces> <SpaceCount>2</SpaceCount> </Settings> }}} <<BR>>It is used to build the Settings window (button {{attachment:Settings24.png || width=24}} of the command bar).<<BR>> {{attachment:Settings.png || width=243}}<<BR>> Look at the individual tooltips on the Window for more information on each settings. |
wpfXamlEditor
UNDER CONSTRUCTION
Overview
XamlEditor is a Xaml editor for an APL variable or for a file on disk. This user command is able to show the Xaml in color with folding, print it, reorganize it so it is more readable according to some settings set by the user. It is inspired by the work of Robby Ingebretsen of Kaxaml (http://www.Kaxaml.com). It is particularly valuable for APLers that like to keep their Xaml in the workspace. With XamlEditor they have a tool to maintain it without effort.
Usage
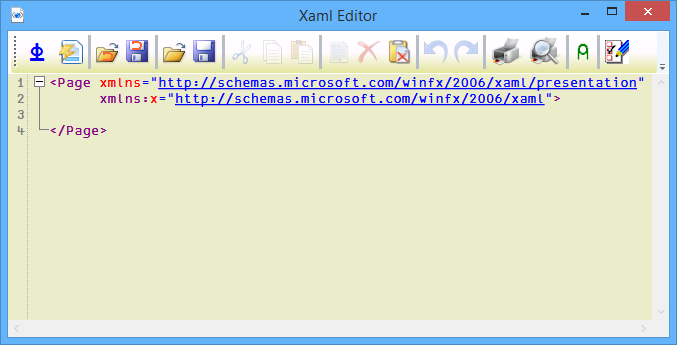
Once installed the user command can be invoke by typing ]XamlEditor (casing is not important, no argument). The following start-up screen will appear:

Here is a short description for each buttons:
Button |
Explanation |
Button |
Explanation |
|
Execute the Xaml and Show the Result in a Separate Window |
|
Select All the Xaml |
|
Scrub the Xaml According to Settings |
|
Delete the Selected Text |
|
Open a Dialog Box to Select a Xaml Variable in the WS |
|
Clear the Clipboard |
|
Open a Dialog Box to Save the Xaml as a Variable in the WS |
|
Undo Last Operation |
|
Open a Dialog Box to Select a File on Disk |
|
Redo Previous Operation |
|
Open a Dialog Box to Save the Xaml to a File |
|
Print All the Xaml |
|
Cut the Selected Text to The Clipboard |
|
Print Preview All the Xaml |
|
Copy the Selected Text to the Clipboard |
|
Make Selected Text a Comment |
|
Paste the Text From the clipboard |
|
Choose the Settings when Scrubbing |
Installation
Download the file wpfXamlEditor.1.0.zip. It contains the Dyalog user command file wpfXamlEditor.dyalog and a dll named ICSharpCode.AvalonEdit.dll
Copy the file wpfXamlEditor.dyalog to your user command directory (for advice how to organize your User Commands see UserCommands/WhereShouldTheyGo).
Copy the file ICSharpCode.AvalonEdit.dll to the same directory as your dyalog.exe file (as shown by doing +2 ⎕NQ'.' 'GetEnvironment' 'Dyalog')(you may need administrator privileges for doing that). That dll is free of charge and was written by Daniel Grunwald. It can be downloaded from CodeProject or from AvalonEdit but is included in the zip file for commodity.
Detailed Explanations
|
Execute the Xaml and Show the Result in a Separate Window |
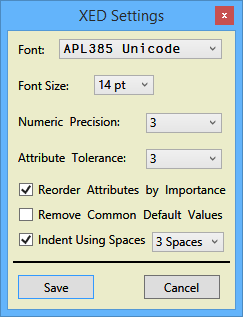
The settings for scrubbing are saved in a xml file named XED.Settings.xml. The file will be created automatically the first time the user command runs. It will be located next to the wpfXamlEditor.dyalog file or in the AppData directory depending on the Windows version and security. The data of the file looks like this:
<Settings>
  <EditorFont>APL385 Unicode</EditorFont>
  <EditorFontSize>14</EditorFontSize>
  <ReducePrecision>0</ReducePrecision>
  <Precision>10</Precision>
  <AttributeCounteTolerance>2</AttributeCounteTolerance>
  <ReorderAttributes>1</ReorderAttributes>
  <RemoveCommonDefaultValues>1</RemoveCommonDefaultValues>
  <ConvertTabsToSpaces>1</ConvertTabsToSpaces>
  <SpaceCount>2</SpaceCount>
</Settings>
It is used to build the Settings window (button ![]() of the command bar).
of the command bar).

Look at the individual tooltips on the Window for more information on each settings.
 APL Wiki